John Coltrane, Nicolas Slonimsky and The Arduino — Part 2
Part 2 of 2: The Tech
In case you haven’t already, you might want to read the first part which focuses on the musical background and inspiration for this project.
The video above shows a nifty little device that I built called the Slonimskiator. At it’s heart is an Arduino that’s been programmed to generate melodic patterns based on the concepts in Slonimsky’s Thesaurus of Melodic Scales and Patterns. It spits out notes using MIDI so that they can be understood by pretty much any synth or electronic instrument. In the video I’ve got it plugged into a Dave Smith Prophet 08 analog synth.
In this second part I’ll talk tech — how to make the Arduino speak MIDI, using randomness and rules to generate the patterns, including a slight tangent on what randomness actually means in a deterministic world.
Development Process
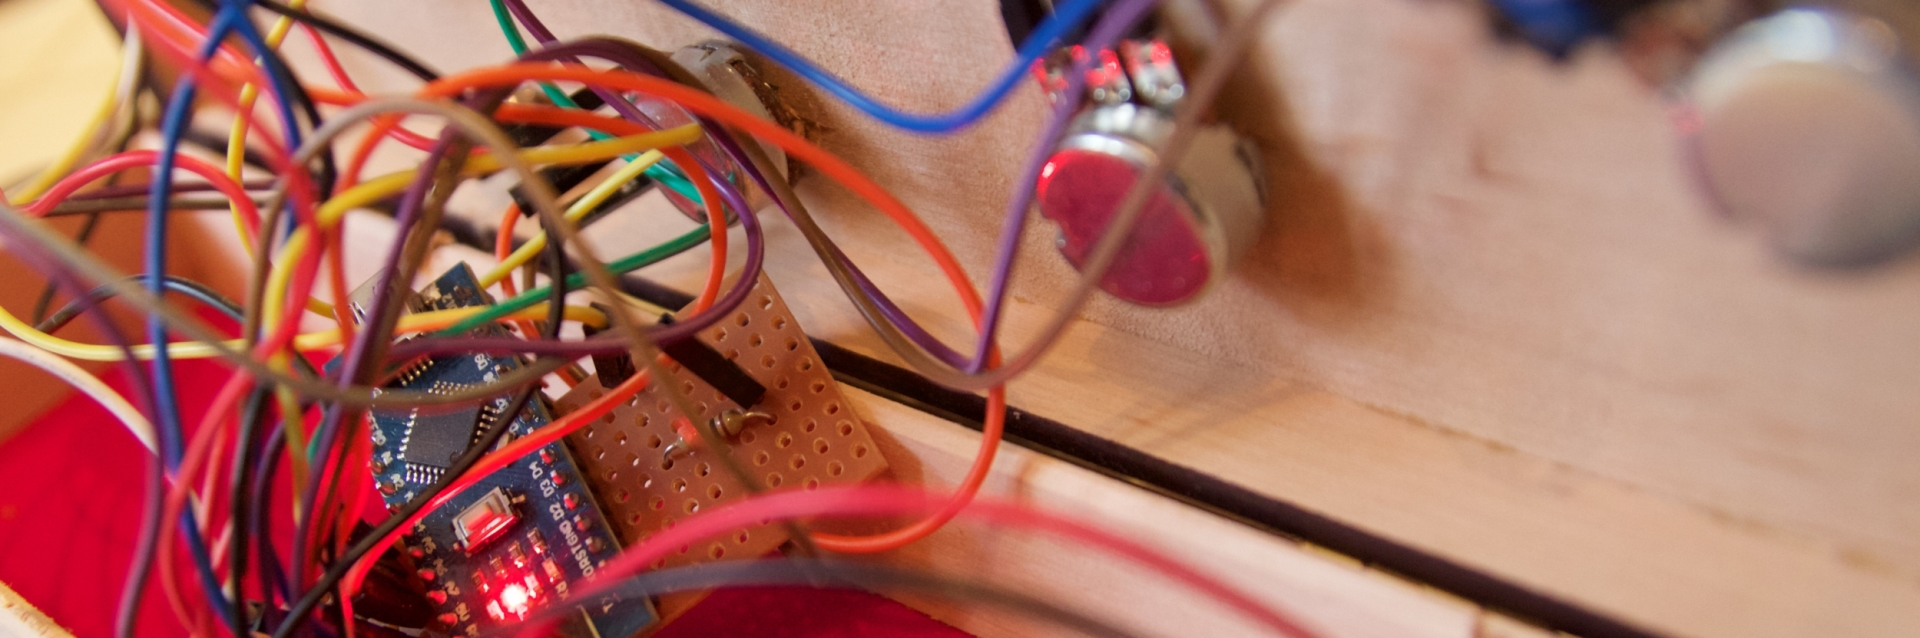
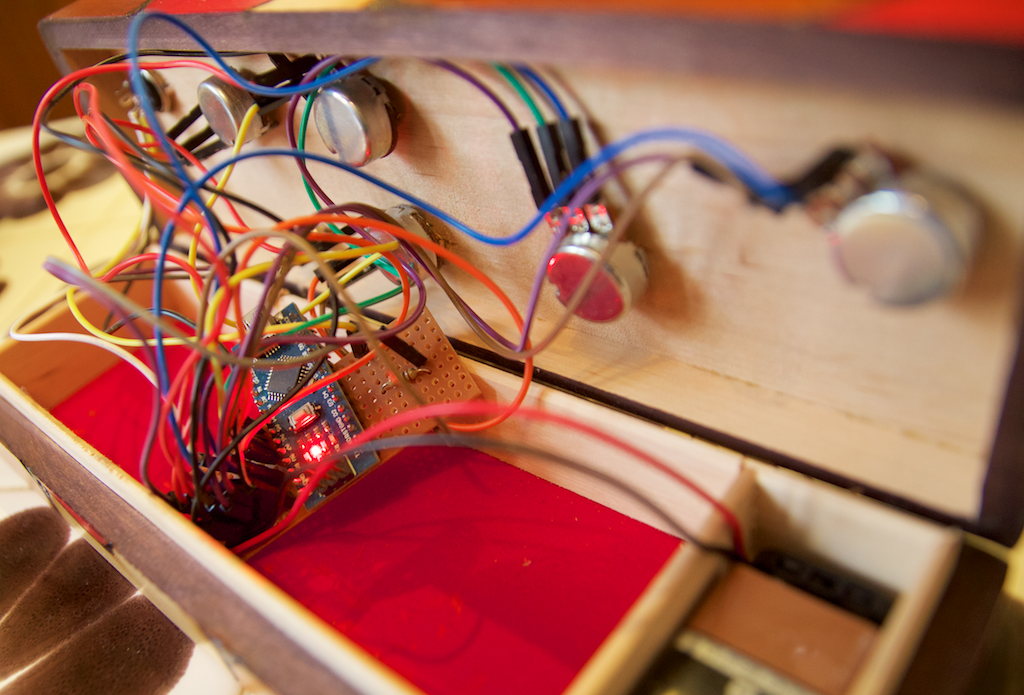
The prototype was built with an Arduino Pro board, plugged into some breadboard. For easy debugging I used the on-board serial over USB to send debug messages to my Macbook screen. SoftwareSerial was then used for MIDI out, which I connected to a synth to hear what was going on.
Once the basic program for generating sequences and transposing them up and down was in place, I decided on what parameters I’d want to control with hardware knobs. Pots and switches were purchased and connected up, then I ported everything to a much smaller Nano ATMega328 board — a generic model that cost just £5.
After finding a nice box, I figured out how I wanted to lay out the controls, then did some drilling, filing, and fitting to get everything in place. It runs from a 9V battery for now as it’s simple and portable.
This was my first Arduino project so I probably did lots of stupid things along the way. I can’t remember all of them, but I’ll try to mention the main gotchas I came across that weren’t well documented elsewhere.
What does it do?
As you can tell from the development process, the final product was arrived at through several long evenings of experimentation, rather than from up-front specification. This is how it ended up:
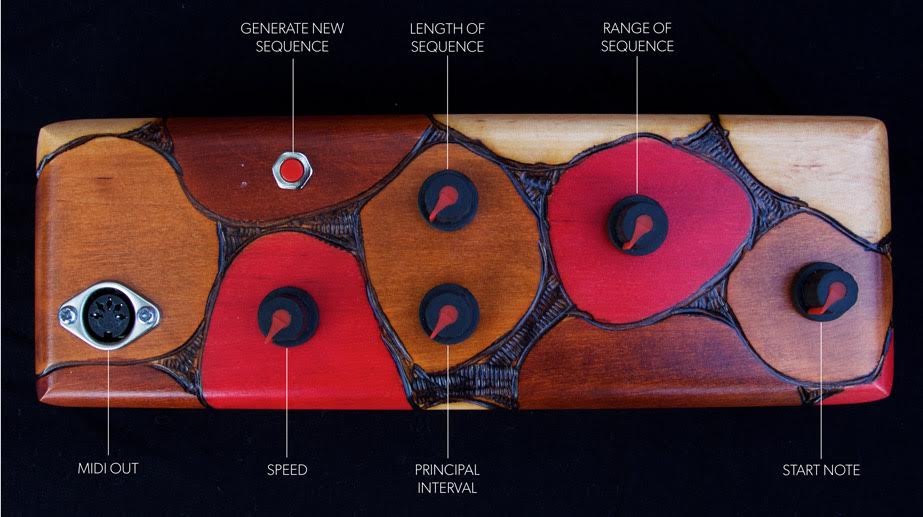
Controls
- Generate New Sequence - generate a new sequence of “interpolated” notes and start playing again from the start note.
- Length of Sequence - number of notes in the sequence.
- Range of Sequence - max distance of sequence notes from principal interval.
- Start Note - lowest note that will be played.
- Principal Interval - the number of semitones to transpose the sequence by each time.
- Speed - the time we wait between playing each note.
You can see how these controls affect the output in the demo video at the top. Essentially, the process is to generate a random sequence of notes, given the length, range, and start note parameters, then to transpose this sequence up and down by the principal interval, waiting 1/speed between each note played. This sound clip gives you a fairly clear idea of the sort of patterns it produces:
Arduino Code & Config
The full code and pinout is available on Github. It’s not a work of art as this was only supposed to be a quick hack. I didn’t use any libraries (apart from SoftwareSerial) because there wasn’t really a need to. Sometimes this is the best way to dive in and learn as much as possible in a short amount of time.
Design Challenges
MIDI
One of the first challenges was figuring out how to get the Arduino to speak MIDI. There were some libraries for this but they all looked unnecessarily complex for my needs, mostly because I only need to send, not receive.
The General MIDI protocol is pretty simple. It runs over 31250 baud serial — this was apparently chosen because it is an exact division of 1MHz , the most common clock speed of microprocessors around the time MIDI was born.
MIDI Messages are comprised of 3 bytes, the first is a status byte denoting which type of message we’re sending (e.g. NoteOn), and the second two bytes are data bytes, containing parameters for the message. In the case of a NoteOn message, the data bytes contain note and velocity respectively.
It turns out that we only ever really need to send one type of MIDI message — NoteOn, since almost all synths will interpret a NoteOn with velocity=0 as a NoteOff. So if we want to play middle C (note 60) for 1 second we’d do this in pseudocode:
To get the Arduino to do this you can use the following code:
Selecting Discrete Values with Pots
Many of the controls select from a range of discrete values, however we are using potentiometers (variable resistors) to do this instead of more complex and expensive rotary encoders.
I’m sure there’s a better way to do this but my hacky method was to use the pot as a potential divider, read the voltage with analogRead(), then quantise the value into a variable number of allowed steps. Make sure you buy linear rather than log pots, I used 10kΩ.
Polling the pot values takes a bit of time, so in our program we do this between every note to make sure the delay between each note is consistent. If a pot value has changed then we adjust the sequence as necessary.
Generating Random Sequences
We want to generate a new sequence each time the “generate new sequence” button is pressed. For this we will need to use a random number generator of some sort.
Any one who considers arithmetical methods of producing random digits is, of course, in a state of sin.
John Von Neuman
Getting a computer to be unpredictable is hard. We don’t want the same set of “random” numbers to be generated each time we power on the device. A perfect random number generator would have two properties:
- Uniform distribution — each possible number is as equally likely to be chosen.
- Statistical independence — each number chosen is not in any way affected by the numbers previously chosen.
For our purposes we don’t need a perfect, or even cryptographically secure random number generator. We can make use of a pseudo-random-number-generator (PRNG).
To make sure that our PRNG produces a different set of numbers each time it’s started up, we can harness some natural entropy from physical phenomena. There a tonnes of possible sources of natural entropy — radioactive decay, thermal noise, or even your mouse movements over a period of time.
In our case we will use the classic method of reading from an unconnected analog pin to generate some entropy that will “seed” our PRNG. This is far from secure, the unconnected pin acts as an ariel and so a malicious attacker could saturate the value read from the pin with an electromagnetic source. Thankfully we don’t care.
What does it sound like?
Here are some little vignettes that were recorded live while playing with the Slonimskiator, plugged into a Dave Smith Prophet 08 (analog synth) and Eventide Space (reverb effect).
Call to Action…
If you’d like to collaborate on a music / tech project please get in touch.
When I’m not making weird noises I’m making exiting, innovative and scalable data driven applications for our clients at Atchai.